Samsung SmartTV Client
VDR on Smart TV Widget is currently (?) only supported for Samsung Smart TVs (TS and BlueRay Player) from ES Series (2012 Models) and newer. There is a certain chance that the Widget runs on Samsung D-Series as well. The widget fetches the needed information using HTTP from the smarttvweb plugin. The plugin allows the widget also to store resume information, delete recordings, etc.
The plugin also exposes a Web GUI so that you can access your recordings conveniently from your PC, SmartPhone or Tablet.
The smarttvweb plugin implements a simple (single threaded) Web Server. It supports multiple simultaneous HTTP sessions, including HTTP Byte Range support for seeking and trick play. The recordings are not duplicated, transcoded or re-formated. The plugin cuts the media segments and HTTP range requests from the TS or PES recordings.
As default, the plugin server listens on port 8000. No extra libraries (beside pthread) are needed for the plugin. Just compile and load it.
Features
- Playback of Recording (in SD and HD)
- Seeking in Recordings (forward and backward)
- Trickplay of recordings (not while recording is in progress)
- Watching recordings while recording
- Subfolder handling for recordings and live channels
- Live Channels (through streamdev Plugin)
- Resume support: The server plugin stores resume information for each recording
- Deletion of recordings
- Changing the audio track
- EPG (Live) and metadata
- Update of available recordings. A notification is shown, when a new recording starts and the recording list is updated.
- EPG Image: When a preview_vdr.png image is in the recording folder, it is show with the recording description.
- MP4 descriptions from iTunes metadata (incl. Cover Image)
- YouTube: The Widget allows play-back of YouTube Items
- Multiple Clients
- Multiple Servers
- Timer maintenance: Viewing and Deleting Timers
- Support reccmd.conf
Known Issues
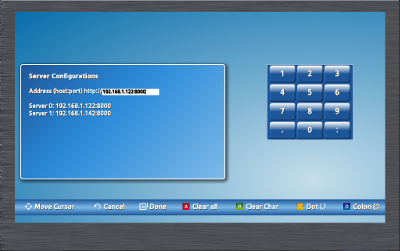
- Initial Plugin-Server configuration in the widget is still a bit cumbersome (improvement suggestions appreciated). Detailed widget configurations are loaded from the plugin.
- Play-Back of Project-X post processed PES recordings get sometimes out of sync (audio & video).
- My Samsung does not support using HLS or HAS for HD videos with high frame rates (e.g. ARD HD). This is not an issue when the recordings are completed. This is only an issue when playing back while recording is still on-going.
- Playback stops, if the MPEG-TS stream contains errors. It is recommended to add
<usePdlForRecordings>false</usePdlForRecordings>into yourwidget.conf - Additional debugging and handling of error cases needed
- Multiple clients can connect to the same VDR server instance. However, some information such as Resume are stored only once.
- Some others
Future Features
- Recording maintenance: Move recordings
- Auto-Discovery of servers
- DLNA support (DLNA API is available though Javascript, thus, GUI can be tailored to the needs)
- Support cmd.conf
Requirements
- Streamdev-plugin for Live TV
Widget Usage (Remote Control Keys)
GUI navigation is mainly based on the Arrow Keys (left, right, up, down) in combination with Enter and Return.
The up and down keys in a menu allows you to select the next or previous item. The keys left and right is equal to a page up (left) and page down (right). This is helpful to navigate through larger listings.
You enter subfolder by pressing the Enter Key. You leave subfolders by pressing Return.
Pressing the Blue key while the list of recordings is shown changes the sorting of the recordings. Default sorting is by name (see widget.conf). Alternative sorting are by date ascending and by date descending.
Start playback of a recording or tune into a live channel either by pressing Enter of Play. Pressing Enter during playback shows you the progress bar including additional information. Pressing Stop or Return stops the live or recording playback. Enter Exit will stop the video and lead you into the initial select window.
Pressing the Info Key during playback shows the description of the recording or the currently watched live program.
Pressing the Blue key during playback changed the audio track (if more than one if included in the stream).
Pressing Program Up or Down key while watching live changes the live channel. No other features are available during Live.
Direct Channel Access is supported for Live: Type in the channel number through the remote to change to the wanted channel.
The Info key shows additional information about the recording / live program as overlay.
The P. Size key allows to change the aspect ratio: Default is 16-by-9. Old recordings may still be in 4-by-3 or even 16-by-9 in 4-by-3 (to be cropped).
While playing back recordings, items from the menue folder or YouTube Clips: With the keys 1 to 9, you can jump to the according percentage of playback time, e.g. pressing 5 results in "jumping to the middle" of the recording. Pressing left or right key while watching a recording result in a 30sec jump (duration configurable with the Up and Down key, when the progress bar is shown). The left and right keys as well as the FF and RW keys allow skipping forward or backward (jumping). Default is 30sec. You can adjust the skip duration with the Up and Down-Keys. Reset the skip duration to the default by press Enter twice (once for showing the progress overlay and then once for resetting it).
Real fast forward and rewind (trick play) is supported for recordings and media (2x, 4x, 8x, ...). Only 2x fast forward is supported while when watching while recording.
Use the bookmarklets (see below) to save YouTube Clip URLs. Both bookmarklets start the clip playback automatically, when you are in the YouTube menu or watching a YouTube Clip.
Pressing the Yellow Key in the YouTube menu allows the deletion of YouTube entries.
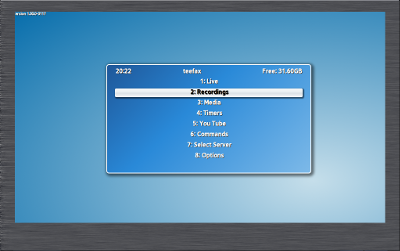
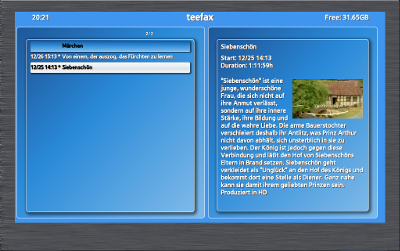
SmartTV Screenshots
 |
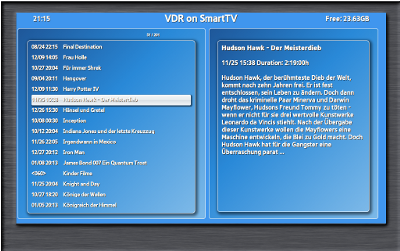 |
| Initial Select Screen | Recording Select Screen |
 |
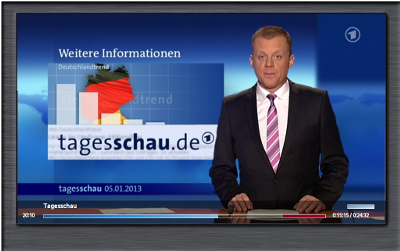 |
| Recording with Poster | Playback while Recoding (Progress (Blue) and recording bar (Red)) |
 |
|
| Options Menu |
Samsung SmartTV Widget installation
There is currently two ways to install the widget on your Smart TV. Either download the source code or downloaded the Zipped Widget. You need to have install the Samsung Smart TV SDK to develop Smart TV widgets (Alt 2). For just deploying the Zipped widget, you need to have a Web Server on port 80 (Alt 1). The simplest way for the widget installation seems to be with thttpd.
The Samsung SmartTV SDK can be downloaded (Link) after registration. I still use the SDK version 3.5.2, since I had some issues with the SDK 4.0 beta.
Widgets can be fetched through the Samsung SmartHub or may be installed as "user" for testing purposes on your TV. Follow the Samsung instructions
Testing Your Application on a TV to login as developer (develop) on your TV and sync Widgets from your local server.
Note, for Samsung D-Series, you need to set the serverUrl in the Config.js file (see below for a detailed description). The On-TV configuration does currently only with for 2012 Series.
Alt 1: Web Server like thttpd, Apache, etc
An web server (on port 80) is needed to deploy your Widget onto a TV. An Apache server is typically installed with the SDK on your Windows PC. However, you can also deploy the test widgets using a separate web server. You can you Apache or thttpd for it. Alternatively, you can create a simple web server with Python (See) which is a recommended solution for MAC users.
The SDK packager puts all Widget files first into a zip file and places it in a Widget folder on the web server. A file called widgetlist.xml is located in the root folder of the web server.
Content of the widgetlist.xml file:
<?xml version="1.0" encoding="UTF-8" standalone="no"?>
<rsp stat="ok">
<list>
<widget id="VdrOnTv">
<title>VdrOnTv</title>
<compression size="209956" type="zip"/>
<description/>
<download>http://<inst-server>/Widget/VdrOnTv_<Name>.zip</download>
</widget>
</list>
</rsp>
Notes:
- Unfortunately, the SmartTV requires an absolution URL in the
downloadelement. - The value of the size attribute is ignored by the TV
- Download the highest Widget version from http://projects.vdr-developer.org/projects/plg-smarttvweb/files.
unzip Widget-v08.zip. The Zip contains two files,widgetlist.xmlandWidget/VdrOnTv_0.8_Europe_20121229.zip- Open
widgetlist.xml, e.g. with emacs and replace the IP Address from192.168.1.145in the<download>element to your own widget installation server IP address. The link must be an absolute URL. thttpd -d <folder, where you un-zipped the Widget-vXY.zip>. This command allows you to access thewidgetlist.xmlthrough HTTP- Check that you can access the files, e.g. by requesting
http://<inst-server>/widgetlist.xmlandhttp://<inst-server>/Widget/VdrOnTv_0.8_Europe_20121229.zip. The widget installation server must listen on port 80. - Finally, follow Testing Your Application on a TV to get the Widget onto your TV.
- Copy the
./Widget-v08.zip(use the latest version) into the root folder of your HTTP Server (e.g./var/wwwon Ubuntu orC:\Program Files (x86)\Apache Software Foundation\Apache2.2\htdocson a Windows64 Apache installation). unzip Widget-v08.zip. The Zip contains two files,widgetlist.xmlandWidget/VdrOnTv_0.8_Europe_20121229.zip- Open
widgetlist.xml, e.g. with emacs and replace the IP Address from192.168.1.145in the<download>element to your own widget installation server IP address. The link must be an absolute URL. - Check that you can access the files, e.g. by requesting
http://<inst-server>/widgetlist.xmlandhttp://<inst-server>/Widget/VdrOnTv_0.8_Europe_20121229.zip. The widget installation server must listen on port 80. - Finally, follow Testing Your Application on a TV to get the Widget onto your TV.
Optionally, you may unzip Widget/VdrOnTv_0.8_Europe_20121229.zip to change the serverURL in Javascript/Config.js (See Opt 1 and Opt 2 of the SDK installation section). All .js, .css, .html, etc files are just zipped together. Ensure the same zip-structure when zipping your widget again.
Alt 2: SDK installation
For active Widget Development, install the SmartTV SDK (Link). The SDK is bundled with eclipse and contains an TV emulator. I had some issues during the SDK installation since the SDK requires a specific Visual C++ redistributable package.
Once the SDK is installed, you can run your Widget Code in the SmartTV emulator and package it for deployment.
Steps: First you need to setup the SDK- Download and install the Samsung SDK (Link).
- Launch the Eclipse Version, which is shipped with the SDK
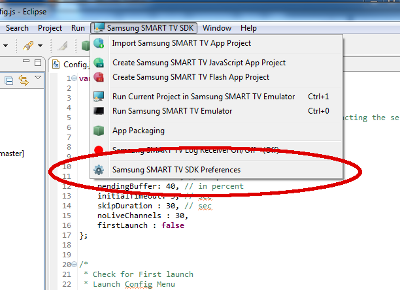
- Configure the Samsung extensions: "Samsung SMART TV SDK" -> "Samsung SMART TV SDK Preferences" (See screenshot below). Goto into "Server" tab and check that the Root Folder matches with your Apache installation.
- Clone the git repository:
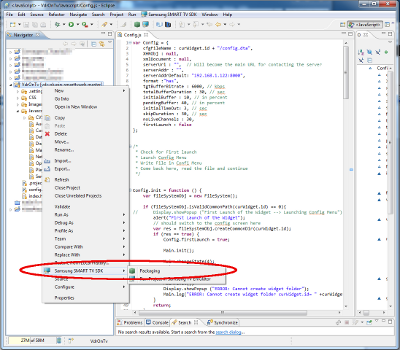
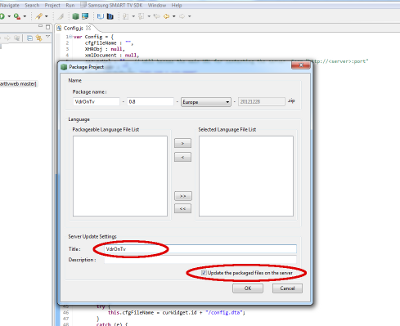
git clone git://projects.vdr-developer.org/vdr-plugin-smarttvweb.git. Either use Eclipse or import the content ofsmarttv-clientfolder into eclipse. It should show up as "VdrOnTv" Project in eclipse - In Navigator, Right-Click on "VdrOnTv" Project, then select "Samsung SMART TV SDK"->"Packaging" (see "Opening Packaging Screen" Screenshot below). Tick "Update the packaged files on the server" (bottom right) and enter "VdrOnTv" as Title (see "Packaging Screen" Screenshot below). Click OK
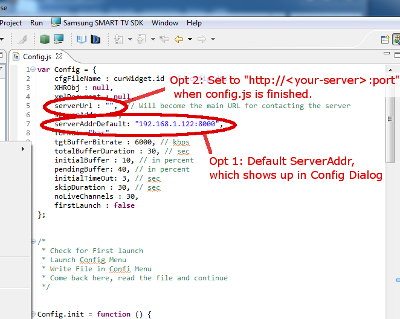
- Optional (see "Optional Configurations" Screenshot): To make initial config easier, open Javascript->Config.js and (Opt 1) adjust
serverAddrDefaultto your local VDR plugin server. This option offers you your server address in the Config Screen, so that you don't need to enter it through your remote. TheserverAddris then stored with the widget on your TV. The other option would be to hardcode the server URL (serverUrlin form of "http://<your-server>:port"). This option is necessary, when you test the GUI through a Chrome Browser. - Finally, follow Testing Your Application on a TV to get the Widget onto your TV.
 |
 |
| Opening Packaging Screen | Packaging Screen |
 |
|
| Optional Configurations |
Configurations
widget.conf
The widget.conf file is fetched by the SmartTV widget at startup. It contains various configuration parameters.
<?xml version="1.0" encoding="UTF-8"?>
<config>
<format>hls</format>
<tgtBufferBitrate>6000000</tgtBufferBitrate>
<totalBufferDuration>40</totalBufferDuration>
<initialBuffer>20</initialBuffer>
<pendingBuffer>50</pendingBuffer>
<initialTimeOut>5</initialTimeOut>
<skipDuration>30</skipDuration>
<liveChannels>20</liveChannels>
<directAccessTimeout>2000</directAccessTimeout>
<sortType>0</sortType>
</config>
format: Either Apple HTTP Live Streaming (HLS) or OIPF/DASH (has)
totalBufferDuration: Total buffer size in seconds
tgtBufferBitrate: Bitrate for buffer calculation
initialBuffer: Startup buffer size in percent to the total buffer duration
pendingBuffer: Pending buffer size in percent to the total buffer duration (bit unclear definition from Samsung)
initialTimeOut: timeout after which the player leaves the buffer state
skipDuration: duration in seconds for skipping during fast forward seek or rewind.
liveChannels: number of Live TV Channels to be fetched.
directAccessTimeout: timeout duration for direct access.
Optional:
widgetdebug: the line <widgetdebug>true</widgetdebug> enables widget debugging into the plugin log.
usePdlForRecordings: The line <usePdlForRecordings>false</usePdlForRecordings> enables HLS / HAS for recording playback.
sortType: Change the sorting default of the recordings menu: by name (0), by date (1 or 2), by name (3)
YouTube Bookmarklets
In order to add the YouTube bookmarklets to your bookmarks, browser to http://<yourserver>:8000/bmlet-inst.html.
Usage:
Browse to your favorite YouTube page (in form .../watch?v=<...>) and click the bookmark to the bookmarklet. The YouTube video is then provided to the VDR smarttvweb plugin, stored there and pushed to the TV screen for immediate playback. Tested with Firefox.
- YT Play: Start the playback of a YouTube clip (works only, if you are in the YouTube Menu or playing a YouTube Clip).
- YT SaveNPlay: Save the YouTube Clip URL in the plugin. If you are watching a YouTube Clip or are in the YouTube menu, then the playback of the selected clips is started automatically.
A popup appears during the first communication attempt on TV screen, which you need to accept. If the popup does not appear and the YouTube clip does not start playing, then you need to leave the widget, go into the menu and look for the AllShare clients.